The Event controller module allows you to monitor and control a single or a main / twin pair of events.
Creating an Event Controller Module
In the main control page, go to Menu > Modules > New Module. A module settings window will pop up.
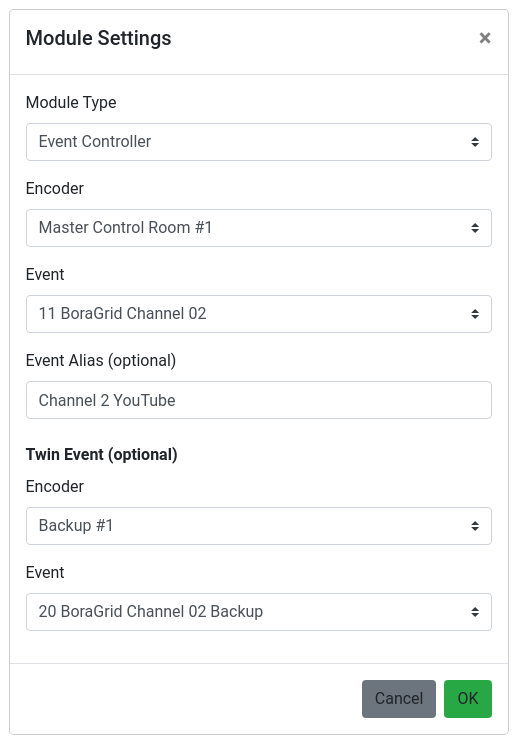
- Select Event Controller as module type. The following fields will be displayed.
Encoder
Select from the list the encoder where the event to be controlled is located.
Event
Select the event to be controlled.
Event Alias (optional)
It allows you to give the event a personalized name. If left blank, the id and original name of the event will be displayed in the module.
Twin Event (optional)
A second Encoder/Event pair can be selected to act as a twin Event.
All commands sent to the main event from this module will also be sent to the twin event. This is very useful in a main/backup transmission.
Normal and Expanded View
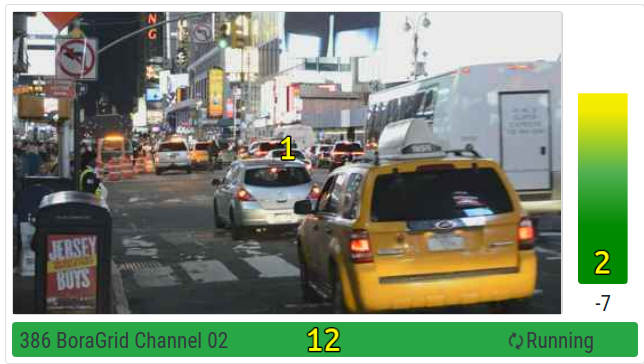
The module allows two types of views. The Normal, with more details and controls, and a cleaner Expanded view.
You can switch between a Normal and an Expanded view by double-clicking on the video preview image or by right-clicking on the module and then clicking “Toggle View”.
Module elements
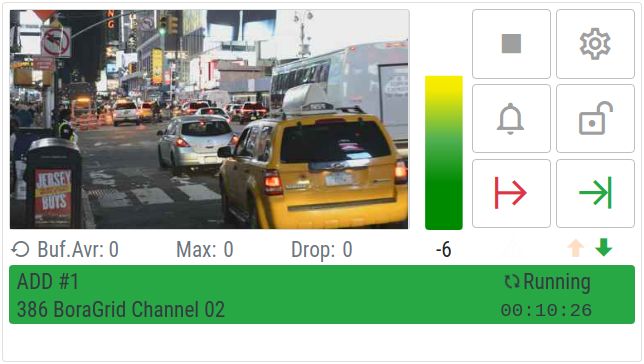
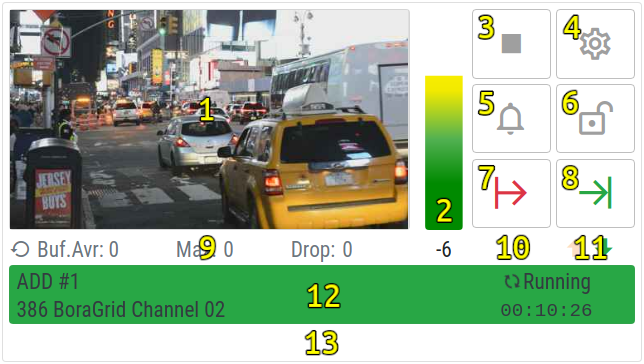
1 – Video Preview
A window with live updated frame captures from current source input.
2 – Audio Meter
Audio level bar and db value.
3 – Control Button
Sends start, stop or reset command to the event.
4 – Module Settings Button
Opens the module settings windows. See “Creating a Event Controller module” below.
5 – Silent Button
Mutes / Unmutes audible alerts from this module.
6 – Lock / Unlock Button
When the module is locked, its buttons and right click menu are disabled. The commands coming from the control panel are ignored.
7 – Cue Out Button
Request a SCTE-35 Cue Out Marker Insertion. Cue markers can be used to perform live stream server-side or player-side ad insertion. For more information, see the article Ad insertion with AWS Elemental Live and Boragrid using SCTE-35 markers.
8 – Cue In Button
Request a SCTE-35 Cue In Marker Insertion. Cue markers can be used to perform live stream server-side or player-side ad insertion. For more information, see the article Ad insertion with AWS Elemental Live and BoraGrid using SCTE-35 markers.
9 – Input Video Buffer Summary Statistics
Displays the input average and maximum buffer used. Click the reset icon to reset stats.
10 – Warning Button
If the event status changes to Warning or Error the Warning Button will be displayed. It will remain visible even if the status changes. Click it to make it disappear.
11 – Network Activity Icons
Orange arrow up icon – Blinks when the module sends a command to the encoder.
Green arrow down Icon – Blinks when the module receives a response from the encoder.
12 – Event Information Display
Displays the following information about the event.
Encoder Name
Event id and name or its alias name
Event Status: Pending, Pre-processing, Running, Post-processing, Warning or Error
Processing Time
13 – Message Area
Right Click Menu
By right clicking on the module, a menu with more features will be displayed.

Toggle View
Toggles the module display between the normal view and the extended view.
Open in the Encoder
It opens a new tab and accesses the event page in the encoder web interface.
Commands
Displays a list of commands that can be sent to the encoder. The list changes according to the status of the event.
Inputs
Allows switching between event inputs.
See the article Switching Inputs in Real-Time.
Images
Allows images to be inserted over the video and removed in real time.
Module Settings
Opens the module settings windows.
Duplicate
Creates a new module with the same parameters as the current one.
Remove
Delete the module from the grid.